
The Physics of Flow: Mastering Speed Graphs, Easing Dynamics & Keyframe Blending
Stop shipping robotic linear motion. Deep dive into speed vs value graphs, Bezier handle tangency, and unlocking Discord-gated production curve presets.
1. The Linear Trap: Why Constant Velocity Repulses the Human Eye
In nature, nothing starts instantly at 500 pixels per second and drops to dead zero on frame 24. A bullet accelerating down a rifled barrel builds pressure. A cheetah sprinting across the savanna leans into its center of gravity before exploding into velocity. Even a falling feather is bound by atmospheric resistance and aerodynamic drag.
Yet, by default, animation software sets keyframes to Linear Interpolation. Linear interpolation calculates changes across frames as a direct mathematical slope:
Linear Acceleration Reality
Velocity is constant from frame 0 to the target frame. At frame 0, acceleration is mathematically infinite: instantaneous velocity shift from 0 to full speed with zero wind-up. At the final keyframe, deceleration is an instant wall. To the mammalian visual cortex, this produces an uncanny, synthetic sensation often referred to in studio circles as "the robotic bounce."
When editors and junior animators try to fix this by blindly pressing F9 (Easy Ease), they simply replace a flat line with an uninspired bell curve. Both extremes look cookie-cutter. Real cinematic weight lives in asymmetrical, high-velocity Bezier curves.
2. Speed Graph vs. Value Graph: Choosing the Right Lens
Most motion designers get stuck because they confuse the two fundamental visualization modes inside After Effects, DaVinci Fusion, and Blender:
- The Value Graph: Plots property magnitude (pixels, degrees, percentages) on the Y-axis against time on the X-axis. A steeper hill represents higher velocity; a plateau represents stillness.
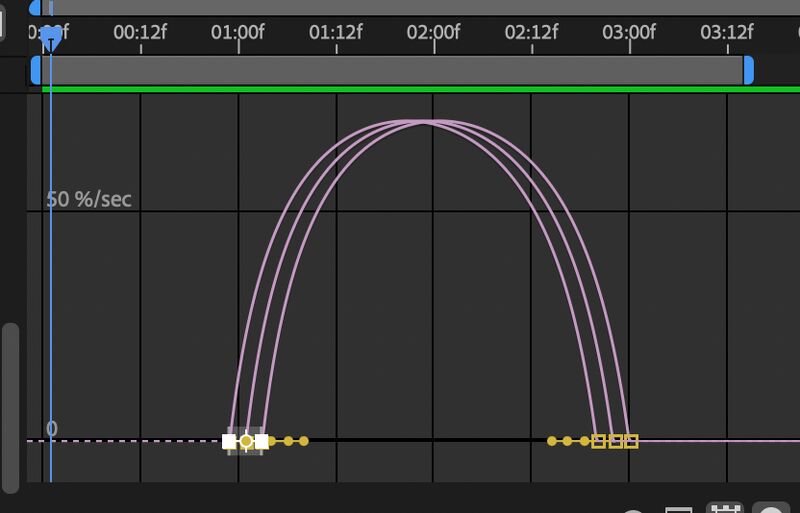
- The Speed Graph: Plots velocity rate (pixels per second) on the Y-axis against time on the X-axis. Zero on the Y-axis means complete rest, regardless of the property’s current spatial coordinates.
Symmetric 33% influence. The animation feels sluggish and amateur because the peak velocity sits dead in the middle.
Extreme 85%+ deceleration influence. Fast explosive release followed by an organic, luxurious settling roll.
The Rule of Thumb: When manipulating multi-dimensional properties (like 2D/3D Position), always separate dimensions into X and Y values. This allows you to sculpt the X speed independently from the Y overshoot, giving your elements true physical trajectory instead of stiff diagonal lines.
3. The Anatomy of Velocity Continuity: Eliminating Micro-Stutters
The most common bug in multi-stage motion sequences is the Velocity Discontinuity. Imagine a typography element that slides in from the left, hits keyframe 2, pauses or turns slightly, and then continues downward.
If the outgoing velocity handle of Keyframe A does not match the incoming velocity handle of Keyframe B, the element suffers a single-frame speed crash. Even if the human eye cannot consciously pinpoint why, the brain flags it as jittery or unpolished.
The 3-Point Tangent Law
Whenever an element transitions between sequential movements without coming to a complete stop, the outgoing speed handle of the preceding keyframe must share the identical tangent angle and speed value as the incoming handle of the following keyframe. In graph terminology, your curve must remain continuously differentiable (C1 continuity).
4. Easing Psychology: Editorial Pacing & Perceived Weight
Curves dictate emotion. High-end commercial editing and tech product reveals (Apple, Nothing, Tesla) do not rely on loud transitions. They use precise velocity ratios that impart an impression of high craft:
- Snappy UI Entrance (85% Deceleration Influence): The element enters at near instantaneous speed, grabbing attention in under 0.15 seconds, but takes 0.6 seconds to gracefully glide the final 10% of the distance. It feels responsive, snappy, yet calm.
- Heavy Mechanical Objects (High Inertia): Start slow (50% ease-in), reach peak speed late, and oscillate slightly past the resting anchor point with a dampened sine-wave overshoot before locking into place.
- Fast Whip Camera Transitions (100% Out / 100% In): Extreme Bezier handles that hit maximum velocity at the exact seam between cuts, hiding the edit point inside motion blur vectors.
Production Presets & Curve Vectors
Gated resources available to verified Discord community members.
Clyvorn Kinetic Easing Pack (.ffx + JSON)
12 custom Bezier presets • After Effects & Premiere
Velocity & Pacing Vector Cheat Sheet (4K PDF)
Mathematical curve breakdown • Print & Studio Desk Reference
Master Curve Rig After Effects Project (.aep)
Live expression controllers • Speed Graph playground
5. Summary: The Clyvorn Motion Checklist
Before delivering any master motion cut, run your timeline through these four physical stress tests:
- Did you separate dimensions? X and Y axes should almost never share identical velocity curves unless moving along a strictly locked 45-degree axis.
- Is the peak velocity intentional? If your curve peak is centered at 50%, ask yourself if the movement is meant to be sluggish. Snappy design requires asymmetrical peaks.
- Is outgoing velocity matching incoming velocity? If an object changes direction without coming to a rest, eliminate angle spikes in your value graphs.
- Does the sound design match the velocity curve? High-speed easing curves require whoosh and riser audio stems timed to the velocity apex, not to the keyframe start point.